It took quite some hassle in the preparation- and installation phase, but now after two weeks with driving I can without hesitation say that the car is Powered by Megajolt .
1973 Saab Sonett III using 1.5 litre Ford V4 Cologne engine. Saab started to use these engines around 1966/67 when it was clear that the till then used twostroke engines needed a more modern replacement. From then on all models 95, 96 and Sonett used these engines. US cars got 1.7 litre engines with reduced compression around 1970/71. My Sonett has a 1.5 engine, a swap done by the previous owner. Apart from the MJ the non-standard items are the Weber 32/36 DGV 5A carb and a dual 2' exhaust. Estimated output 72-73 bhp (standard 65).
I know this is not the first Saab with a V4 engine using Ford Edis parts, but by the look of it I am the first one using MJ. Though startup is a wee bit slower than with standard dizzy with Pertronix Ignitor (firing at first compression stroke while the Edis needs at least one complete crank in order to know the position of the crank shaft), everything that comes after is quite an improvement. Especially i 4th gear the engine was a bit reluctant to rev up between 2800 and 4000 rpm (needed to overtake quickly), sometimes making it necessary to shift down before speeding up, now I just floor it and there it goes .
[/img]
[/img]
[/img]
Here are some clips from the testdrive with the MAP I use now. I just love the sound of the exhaust .
http://www.youtube.com/watch?feature=pl ... woA6-C1oek
http://www.youtube.com/watch?v=zeQAwFgk ... detailpage
http://www.youtube.com/watch?feature=pl ... C54EPePraQ
Alex
1973 Saab Sonett III on MAP version
Moderators: JeffC, rdoherty, stieg, brentp
1973 Saab Sonett III on MAP version
Last edited by Alex B on Thu Jul 09, 2020 7:40 am, edited 4 times in total.
You Can Add Another Sonett III to the List!
Thanks to Alex B's posting, I was motivated to get off my lazy can, ditch my wobbly old stock dizzy, and fire up the ol' Sonett III using the map he so thoughtfully provided in another thread. I've only just finished taking it around the block, but I already notice that my idle is rock steady (used to stumble a bit--I suspected it had a periodic misfire 'cause I have a wideband O2 sensor hooked up and my AFR reading would spike), and part throttle cruise is massively improved with no irritating surging (which probably was my worn-out vacuum advance, but could have been anything). Also, it pulls like a freight train all the way to redline!
On a side note, the car will now happily idle with the mixture screw bottomed all the way out (AFR of around 17)! I look forward to tweaking my carb setup now, along with the ignition map curve, as I had it set up on the rich side.
For the record, I have a 1972 Saab Sonett with a mostly stock 1.7L V4. Mods are a Weber 34 ICH carburetor, mildly ported heads, and a free-flow tuned Y-type exhaust from Jack Lawrence of MSS. Jason Miller at Miller's Mule made my trigger wheel and sensor mount (and did a bang-up job!). I'm running MAP and have a coolant sensor installed. Eventual plan is for a full FI conversion, but this was a great way to dip my toe in the water.
1972 Saab Sonett
Hi EnBee,
Nice to read you are happy with the changeover. How did you install the coolant temp. sensor? I am planning to test if it is possible to use the standard sensor with 2 diodes separating the currents coming from the dashboard guage and the MJ, but have not come to try this. As fall has now begun here I think this project will continue in spring. Do you have pictures? Here is a link to my project described on a British Saab site. http://www.saab-v4.co.uk/speedball/topi ... ic_id=3795
Alex
Re: temp sensor--I just used the recommended GM temp sensor available from this site. It is a 3/8" NPT thread, which happens to be the thread that the silly little PVS apparatus screws into on the thermostat housing (see first pic).
If you go this route, I highly recommend taking the whole thermostat housing off and fixing the elbow fitting in a clamp before attempting to get the PVS unit off. Though now that I think of it, if your engine was from a Euro 96, it might not have the US-mandated PVS unit in it in the same place. If you still have the in-line fitting, it's an easy way to mount it without drilling/tapping another location or messing around with the stock VDO sender.
I used existing holes where the old voltage regulator (not needed with updated alternator) and coil were to mount the EDIS unit and a plate with a fuse panel hooked up to a relay to take care of power for the MJLJ/EDIS/coil pack. For the coil pack, I made a mounting plate that attaches to the bellhousing bolts behind the stock dizzy location (see second pic). I mounted the MJLJ unit about where you did, and also ran a vacuum line through the freewheel pass-through. All other wires went through the stock grommet into the main cabin, so I didn't have to drill any new holes and everything can easily be returned back to stock. You know, for when the next owner attempts a 100-point concours restoration on my Sonett III.
I've got a rebuilt engine with a lot of goodies on the way (high compression Pinto pistons, big valves, Weber 32/36 DVG, Isky cam, etc. , etc.), and am working on a det-can setup based on this thread for eventual dyno or road tuning:
http://www.miataturbo.net/ecus-tuning-5 ... ple-61616/
For the moment, though, I'm just enjoying the experience of tuning my 40 year old car with a laptop! Er, except for the part where I neglected to tighten a couple of hose clamps coming off the water pump--clamps which are virtually unreachable now that I have everything all bolted back together. Doh!
- Attachments
-
- Coil Pack and EDIS Mounting
- IMG_1230.jpg (68.15 KiB) Viewed 36741 times
-
- GM Temp Sensor
- IMG_1229.jpg (53.15 KiB) Viewed 36741 times
1972 Saab Sonett
You are correct that I don't have the PVS gizmo on the thermostat housing so therefore I need an other way. The easiest is then to tap into the existing wiring to the coolant sensor. I installed a wire that runs from the MJ into the engine compartment that can be hooked up to an additional sensor, so the options are open. What is the top of your rev range? As my engine is bone stock considering heads and valves it goes up to 5500rpm without hesitation but then you feel it runs out of steam. I am looking for a faster cam, lighter cam followers and stiffer springs to start with, but haven't yet decided which one to buy. With the Mickey-Mouse speeds that are allowed in this country the engine must also be driveable around 3000rpm.
There is a video out on Youtube of a Verona green Sonett with tuned engine that goes up to 7000rpm without blinking (for anyone not familiar with a Ford Cologne V4 engine, that is quite high for such blocks); that's my reference for now.
Alex
There is a video out on Youtube of a Verona green Sonett with tuned engine that goes up to 7000rpm without blinking (for anyone not familiar with a Ford Cologne V4 engine, that is quite high for such blocks); that's my reference for now.
Alex
-
- Posts: 21
- Joined: Tue Apr 27, 2010 10:32 am
- Location: Craiova, ROMANIA
- Contact:
I never published the hardware bits I used for getting the trigger wheel and VR sensor in place, so here it is.
The hardware of the whole setup that is V4 specific is not too much, but quite essential. There are of course more roads that lead to Rome, but the one I chose was the most practical one for me; standard materials and a construction that doesn't need welding and is easy to adjust on vital places.
First the big picture and the details afterwards.
[/img]
[/img]
[/img]
[/img]
[/img]
[/img]
[/img]
[/img]
[/img]
This setup fits within the triangle that is restricted by the fan belt when the mechanical fan is used. When the triangle is reduced because the fan is not used it is more than likely that it won't fit. But than there is quite a lot of room on the front plate that is no longer occupied by the fan and its pulley. How this can be done is shown in the Saab 96 topic.
The hardware of the whole setup that is V4 specific is not too much, but quite essential. There are of course more roads that lead to Rome, but the one I chose was the most practical one for me; standard materials and a construction that doesn't need welding and is easy to adjust on vital places.
First the big picture and the details afterwards.
[/img]
[/img]
[/img]
[/img]
[/img]
[/img]
[/img]
[/img]
[/img]
This setup fits within the triangle that is restricted by the fan belt when the mechanical fan is used. When the triangle is reduced because the fan is not used it is more than likely that it won't fit. But than there is quite a lot of room on the front plate that is no longer occupied by the fan and its pulley. How this can be done is shown in the Saab 96 topic.
You need to upload your pictures to an online storage, as attached to a hotmail account or something similar. This forum can't link to pictures stored with Bing, so I opened a free Photobucket account. Then it is just copying and pasting the linkaddress. The link must stand between Img-brackets. These show up when you click on the ''Img'' button that is above the text field when you write a reply. When you copy the link that is in the IMG box in Photobucket you don't have to use the IMG button.
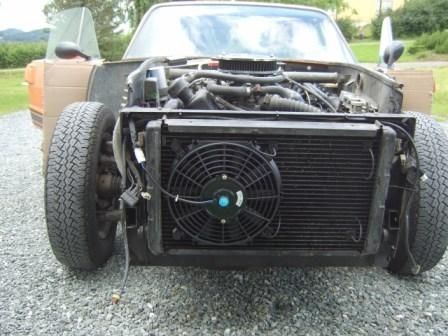
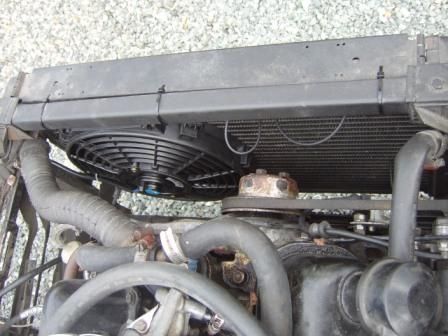
Speaking of pictures and such: Some progress in the project again. I had the nose off in July and decided to install electric cooling fans. A guy on the Swedish Saabclub website inspired me by having installed two 10' fans on his Sonett. He put both in front of the radiator. I prefer to have them behind but in order to get both there means that the bearing of the mechanical fan has to be removed and that (in my case) the trigger wheel and sensor for the Megajolt had to be repositioned. As this was too much work for now I installed one fan in front and one behind.
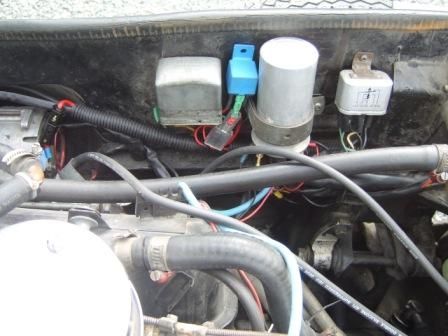
Current for the fans is drawn from the B+ connection at the alternator, secured by a 25 Amp fuse. The switching relay is tucked in nicely between the voltage regulator and the coil. The additional wiring goes partly through the extra flexible tube I put in place for the required MJ loom.
I started programming the activation threshold value as used on the 96, but this was too low; the fans kept going while the needle of the coolant temperature gauge had dropped a bit under horizontal. A small adjustmend solved the problem. Works like a charm .
Alex